In terms of optimizing your computer, 99 Ways to Make Your Computer Blazingly Fast
is tough to top; but if you don’t have the time to initiate all of
those helpful fixes in one session, there are some quick and easy steps
that you can take to rejuvenate a slow computer, all in under an hour.
Check out the top 5 ways to speed up a slow Windows 7 PC. Most of
these fixes and maintenance procedures are common practice for a
computer geek, but may be a gold mine for a beginner PC user looking to
make their computer fast again.

1. Customize Startup Programs
Many of the programs and applications that you install on your PC,
like to configure themselves to start up each time that your computer
starts up. In certain cases they will launch immediately after you login
to Windows, and other times they may run silently in the background.
Either way, these programs that are running can slow down your PC
drastically, and over time, more and more of these ‘auto start’ programs
can set themselves, eventually leading to a waste of system resources.
- Click the Start Menu and type run into the Search programs and files box. Once Windows 7 locates the Run command, click it to open. Type the phrase msconfig into the open: bar within the Run window.

- Click the OK button.
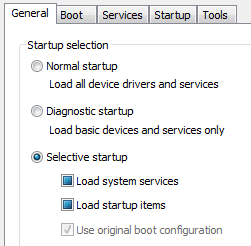
- From within the System Configuration window, make sure that the General tab is selected. Under the heading Startup selection, choose the option titled Selective startup.
- Click the Startup tab. You will find several different Startup Items listed in this window. Click to deselect any programs or applications that you do not need to startup when Windows 7 starts up. After you have finished, click the OK button. You will be prompted with the option to restart your computer. Go ahead and do so.

*If you are unsure of what programs to uncheck, a good rule of thumb
is, leave all Microsoft Corporation startup items selected. Anything by
3rd party manufacturers, such as Adobe, AOL, Google, etc… can all be
unchecked.*
2. Delete Temporary Internet Files
Over time, temporary internet files can begin to build up on your PC
and not only slow it down a bit, but also use valuable hard drive space.
Deleting these files can help regain some speed, especially if you are
using a lower capacity hard drive.
- Navigate the path Start > Control Panel > Internet Options. Make sure that you are on the first tab General, and locate the sub heading Browsing history. Click the Delete… button.

- Upon clicking the Delete… button, a new window should open, displaying many different internet related items that can be deleted. Select any or all of the items and click the Delete button to erase them from your PC. If you have ever wondered how to get rid of internet traces, this is how you do it.

Notably, you can also set your Internet Explorer homepage from the main Internet Properties window. Feel free to set it to http://www.brumealex.blogspot.com for daily tech tips, cool websites, and much more.
3. Run a Disk Cleanup
Windows 7 stores all kinds of temporary files, just not temporary
internet files. The built-in Disk Cleanup utility makes deleting these
files fast and efficient. To use Disk Cleanup:
- Navigate the path Start > All Programs > Accessories > System Tools > Disk Cleanup OR open up the Start Menu and type Disk Cleanup into the search box.
- Disk Cleanup will then analyze the files on your PC and determine which files can be deleted.

- Go through the list of items that can be deleted and check any files that you don’t mind getting rid of. Upon selecting each item in the list, Disk Utility will give you a brief description of what each item is, in case you need further explanation. After you have finished selecting, click the OK button.

4. Uninstall Old Programs and Turn Off Windows Features
After you’ve had your computer for a while, you may download and
install several programs that you only use a couple of times. If you
have some programs installed on your computer that you no longer use, it
doesn’t hurt to get rid of them. This is another procedure that will
give back some hard drive space. It may also speed up your computer
slightly.
- Navigate the path Start > Control Panel. Select the Programs and Features icon.
- This should open up the Programs and Features window, which displays a list of the programs and apps currently installed on your PC. Click to select any program, and click the Uninstall program button to remove it from your PC. Alternatively, you can turn off Windows features that you don’t use by selecting the Turn Windows features on or off option, located in the right side bar.

5. Defragment the Hard Drive
Defragmenting your PC’s hard drive is a good way to get rid of some
junk files, and also move data on your hard drive to different
locations, which will optimize seek and find times. To defrag your PC’s
hard drive:
- Navigate the path Start > All Programs > Accessories > System Tools > Disk Defragmenter.
- The Disk Defragmenter is very easy to use, as it only really has two options: Analyze disks and Defragment disks. Analyze disks gives you a quick overview of how much disk space can be saved from doing a disk defrag. Defragment disks starts the process of disk defragmenting.

A disk defragment may take quite a while, depending on how much space
is used on your hard drive. It may even take several hours. It’s best
to do a disk defragment last, but you can use your PC and do a disk
defrag at the same time.
No comments:
Post a Comment